Monday, May 9, 2016
Class#9: The Design Process
Sunday, May 8, 2016
Class#8 Cooper Hewitt Design Museum Visit
Technical Drawing, Class#8 –Cooper Hewitt Design Museum 3:00pm-5:00pm
From now on in class, we will build on our working knowledge of technical drawing conventions to focus on drawing as it aids the processes of visual research, brainstorming, and design. Please visit the below exhibitions:
BEAUTY—COOPER HEWITT DESIGN TRIENNIAL
ENERGIZING THE EVERYDAY: GIFTS FROM THE GEORGE R. KRAVIS II COLLECTION
MAKING DESIGN: RECENT ACQUISITIONS
TASK: Choose an object or image that most inspires you. It can be an object that you would like to make in your professional life, a piece that you connect to through personal memories, or something that you simply gravitate to because of its beauty, function, or originality.
- Make sketches of the object in your sketchbook. At least 5 drawings, 30-minutes plus . At least one of them should be 15-minutes plus. Sketch your object from all angles. Do a couple quick gesture drawings, and some details. If the object inspires you, draw new forms inspired by the original.
Answer the following questions in your sketchbook:
- Please give a detailed description of the object. Write a whole paragraph,
Describing, shape, color, surface quality, labeling, weight, smell, any sensory details you can document about the object.
- What are the object’s physical dimensions? Label one of your drawings.
- What materials is the object made of?
- Describe in detail how it was crafted or manufactured (based upon what you can figure out, or what is provided by accompanying information).
- What aspects of its making are uncertain, mysterious to you? Be detailed.
- What aspects of its materials or manufacture are inspiring to you, if any?
- What aspects of its intended use or its design are new or inspiring to you, if any?
- Why did you choose to focus on this object over all the others?
- How does this object relate to what you want to create?
Take a lot of notes. Type up your answers (and anything else you want to write about the object in paragraph form) and turn in with your sketches for nexr week’s HW. Also bring your finished multi-view drawing.
Sunday, April 17, 2016
Class#7: Mutliview Drawings of the Object , Next Class in two weeks (May 2nd) meet at Cooper Hewitt Museum!!!
HW#7 and HW: Complete Multiview of your object

May 2nd
 Cooper Hewitt Smithsonian Design Museum
http://www.cooperhewitt.org/
Make a multi-view drawing of your object, showing Front, top, and Right views
Materials: 11x17” paper, engineer’s Scale, compass,triangles, soft and hard lead
- Draw the border and title block, with all appropriate info (see class lecture below)
- Decide on the appropriate scale for you drawing (and fill in this info in the title block)
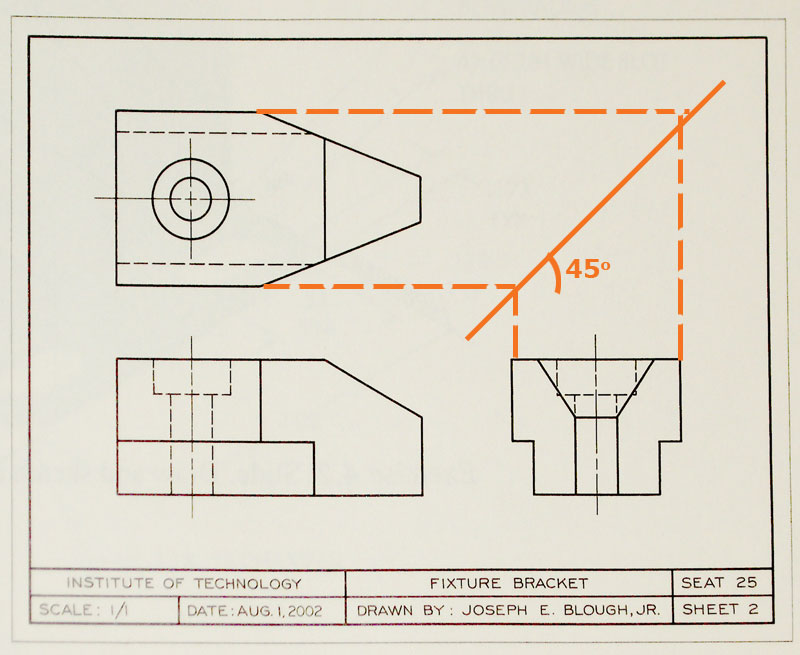
- Lay out the primary dimensions of front, side, and top view, using T-square, triangles, and miter line to transfer dimensions where possible (refer to Class#6 lecture for details).
- Use harder lead for lighter construction, dimension and hidden lines, and softer lead for darker visible lines.
- Label with real world dimensions.
May 2nd
Cooper Hewitt Smithsonian Design Museum
2 E 91st St
New York, NY 10128
From Laguardia: 7 train to 4,5,6 at Grand Central Station
to 86th.
Bring Sketchbook and pencil or pen.
We will have to pay the student entrance fee.
$7 if you buy ticket ahead of time online,
or $9 at the door (with student id)
http://www.cooperhewitt.org/
Monday, April 11, 2016
Class#6, HW: Reconstruct Multiview in-class drawings to isometric
Reconstruct your classmate's multiview drawing to an isometric projection. The reconstruction can be made any size on the page. Try to translate the front, top, right side view into 3-dimensional form!!!!
 ----------->>>>>>
----------->>>>>>
Sunday, April 3, 2016
Week #5: Isometric Drawing of you Object with Dimensions
HW#5:
Isometric Drawing of your Object
Use 11x17 “ paper and graphite
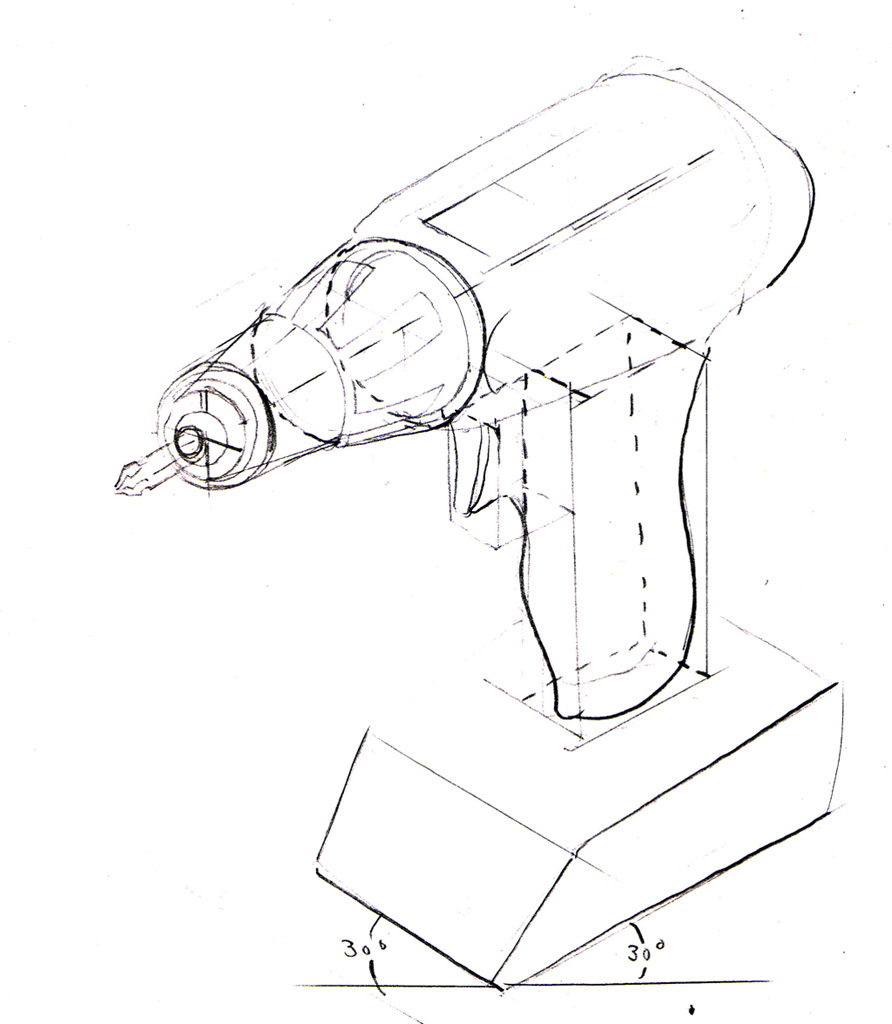
Hoziontal lines parallel with the ground
are at 30-degrees from the bottom of the page as in the drawing to the right--->
NO INK!
NO SHADING!
Use the engineer’s scale to decide what scale (1:2, 2:3, 3:2?) is the best fit for your drawing (what scale allows your object to fill most of the page without going off the page)
- rotate your object to find the position that best communicate the object’s structure
- Decide whether the page should be horizontal or vertical to best fit the object
- Start out by drawing in your object’s longest dimension and your chosen scale--is it the best fit?
(even better start off by roughing in a cube that using the largest measurements of
your object and it’s length width and depth, you will then be sure whether you need to
make changes.
4. Correct drawing and measurement mistakes. Draw all structural (3-dimensional) details (don't worry about patterns, flat text or other surface decoration)
5. There’s too much time allotted to this assignment to return an unfinished drawing.
6. When the drawing is beautiful and structural sound and complete (construction lines should remain.), add dimensions. See below for info:
7. Make sure to write your scale on the page (2:1, 3:2, 4:1, etc)
Tips:
Remember to use center lines when drawing circles, cylinders, or any weirdly-shaped part of your object.
Step back from your drawing often. visually compare length of one part to another. Does it match the object? If it doesnt look right, if probably isnt.
-------------------------------
Notes on Dimensioning: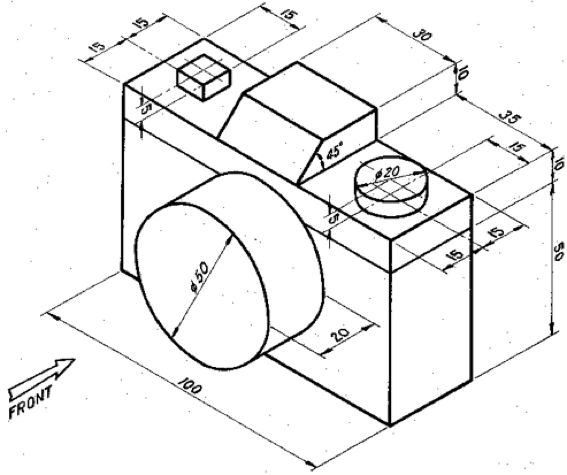
For this assignment, you will also be adding dimensions
to the drawing.
Even though you are scaling up are down from the objects
actual size, you’re dimensions will reflect the objects actual
size.
Somewhere on the page, write the SCALE that you used in your drawing
(2:1, 2:3, etc).
Week #5 Lecture
Monday, March 28, 2016
Class #4 and HW#4
HW # 4 ---Isometric Drawing of your room (Due Thursday, April 2nd)

Step 1 : Use a measuring tape or yard stick to record the dimensions (in feet) of your room, the placement and size of furniture, etc. (it can be any room, but try to pick one that isnt too big)
Record the measurements is a simple diagram, like so:

Step 2: Now use your Architect's scale and your 30x60x90-degree triangle to begin to draw the dimensions of the room.
Use the 3/8 side of your scale (you will measure right to left!)

Step 3:
Now begin drawing out the dimensions of your floor plan, all at 30-degrees from the bottom edge of the page. The width of the room will go 30-degrees in one direction, the depth will go 30-degrees in another.

Step 4: Rough in the entire floor plan of the room to make sure it all fits. Try to make the floor plan fit on the page with alot of room up top, so that you can add the Height dimension.
Step 5: Add the height dimension of the walls, which will be drawn at 90-degrees from the bottom edge of the page. Draw in just the back walls. The front walls are "cut away" so you can see in side.

Step 6: Draw any objects, windows or other details that you wish. I've even drawn myself into the room. Remember all height dimensions are at 90-degrees, and all width and depth dimensions are at 30-degrees.
Class #4 Lecture: Introduction to Scales and Isometric Drawings
Get Link:
https://drive.google.com/open?id=16ah4tCfn-dbHVzrjxv6PKE9ZFFvKX7P2m4eAUG6IKgg
Step 1 : Use a measuring tape or yard stick to record the dimensions (in feet) of your room, the placement and size of furniture, etc. (it can be any room, but try to pick one that isnt too big)
Record the measurements is a simple diagram, like so:
Step 2: Now use your Architect's scale and your 30x60x90-degree triangle to begin to draw the dimensions of the room.
Use the 3/8 side of your scale (you will measure right to left!)
Step 3:
Now begin drawing out the dimensions of your floor plan, all at 30-degrees from the bottom edge of the page. The width of the room will go 30-degrees in one direction, the depth will go 30-degrees in another.
Step 4: Rough in the entire floor plan of the room to make sure it all fits. Try to make the floor plan fit on the page with alot of room up top, so that you can add the Height dimension.
Step 5: Add the height dimension of the walls, which will be drawn at 90-degrees from the bottom edge of the page. Draw in just the back walls. The front walls are "cut away" so you can see in side.
Step 6: Draw any objects, windows or other details that you wish. I've even drawn myself into the room. Remember all height dimensions are at 90-degrees, and all width and depth dimensions are at 30-degrees.
Class #4 Lecture: Introduction to Scales and Isometric Drawings
Get Link:
https://drive.google.com/open?id=16ah4tCfn-dbHVzrjxv6PKE9ZFFvKX7P2m4eAUG6IKgg
Subscribe to:
Posts (Atom)