Sunday, April 17, 2016

Class#7: Mutliview Drawings of the Object , Next Class in two weeks (May 2nd) meet at Cooper Hewitt Museum!!!

HW#7 and HW: Complete Multiview of your object


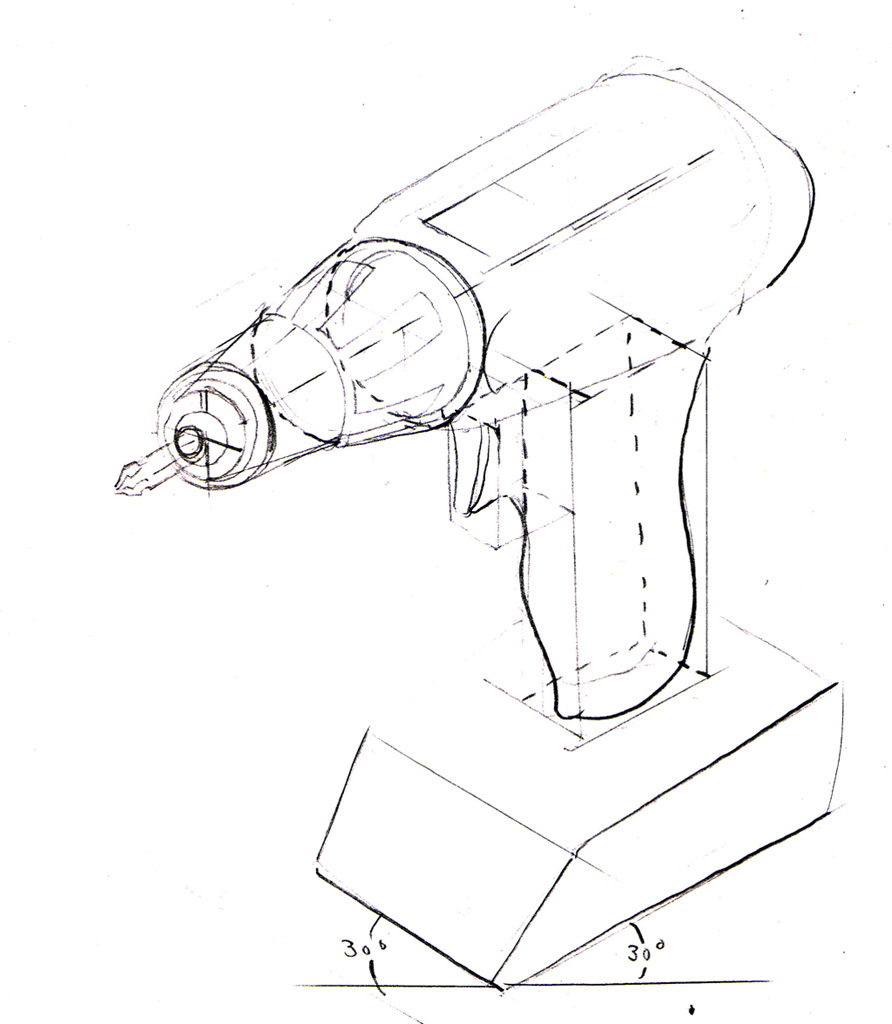
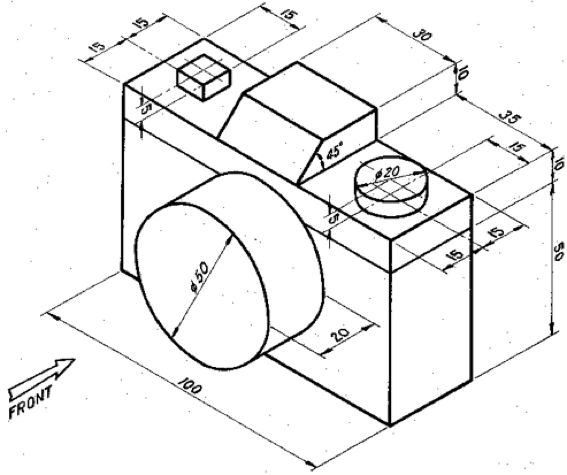
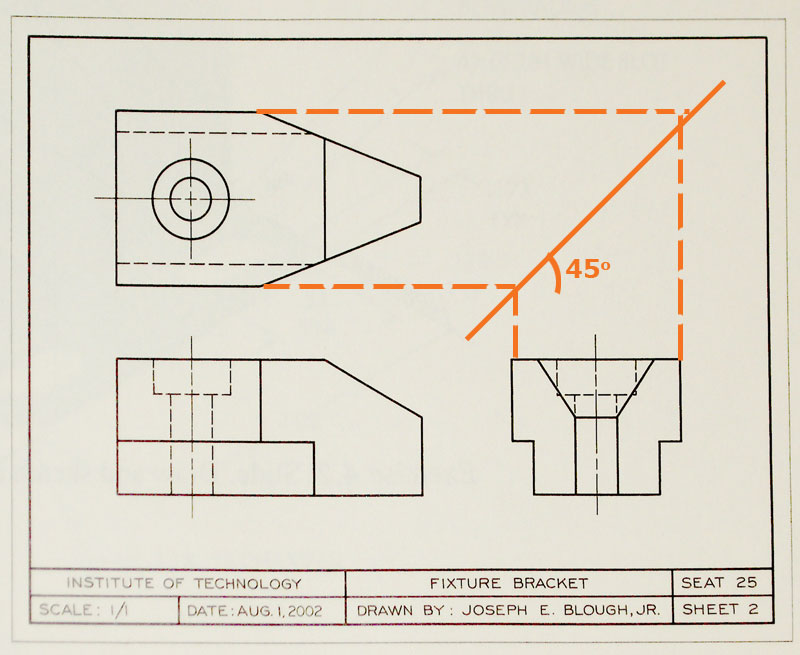
Make a multi-view drawing of your object, showing Front, top, and Right views

Materials: 11x17” paper, engineer’s Scale, compass,triangles, soft and hard lead


  1. Draw the border and title block, with all appropriate info (see class lecture below)
  2. Decide on the appropriate scale for you drawing (and fill in this info in the title block)
  3. Lay out the primary dimensions of front, side, and top view, using T-square, triangles, and miter line to transfer dimensions where possible (refer to Class#6 lecture for details). 
  1. Use harder lead for lighter construction, dimension and hidden lines, and softer lead for darker visible lines. 
  2. Label with real world dimensions.


May 2nd


Cooper Hewitt Smithsonian Design Museum

2 E 91st St
New York, NY 10128

From Laguardia: 7 train to 4,5,6 at Grand Central Station
to 86th.

Bring Sketchbook and pencil or pen.

We will have to pay the student entrance fee.
$7 if you buy ticket ahead of time online,
or $9 at the door (with student id)

http://www.cooperhewitt.org/

Monday, April 11, 2016

Sunday, April 3, 2016

Week #5: Isometric Drawing of you Object with Dimensions


HW#5:
Isometric Drawing of your Object


 Use 11x17 “ paper and graphite


Hoziontal lines parallel with the ground
are at 30-degrees from the bottom of the page as in the drawing to the right--->

NO INK!
NO SHADING!

Use the engineer’s scale to decide what scale (1:2, 2:3, 3:2?) is the best fit for your drawing (what scale allows your object to fill most of the page without going off the page)

  1. rotate your object to find the position that best communicate the object’s structure
  2. Decide whether the page should be horizontal or vertical to best fit the object
  3. Start out by drawing in your object’s longest dimension and your chosen scale--is it the best fit?
          (even better start off by roughing in a cube that using the largest measurements of    
          your object and it’s length width and depth, you will then be sure whether you need to 
           make changes.

       4. Correct drawing and measurement mistakes. Draw all structural (3-dimensional) details (don't worry about patterns, flat text or other surface decoration)

      5. There’s too much time allotted to this assignment to return an unfinished drawing.
       6. When the drawing is beautiful and structural sound and complete (construction lines should remain.), add dimensions. See below for info:
      7. Make sure to write your scale on the page (2:1, 3:2, 4:1, etc)

Tips: 
Remember to use center lines  when drawing circles, cylinders, or any weirdly-shaped part of your object. 

Step back from your drawing often. visually compare length of one part to another. Does it match the object? If it doesnt look right, if probably isnt.

-------------------------------
Notes on Dimensioning:

Camera.png

For this assignment, you will also be adding dimensions
to the drawing.

Even though you are scaling up are down from the objects
actual size, you’re dimensions will reflect the objects actual
size.

Somewhere on the page, write the SCALE that you used in your drawing
(2:1, 2:3, etc).  


Week #5 Lecture

Monday, March 28, 2016

Class #4 and HW#4

HW # 4 ---Isometric Drawing of your room (Due Thursday, April 2nd)


Step 1 : Use a measuring tape or yard stick to record the dimensions (in feet) of your room, the placement and size of furniture, etc. (it can be any room, but try to pick one that isnt too big)

Record the measurements is a simple diagram, like so:


Step 2: Now use your Architect's scale and your 30x60x90-degree triangle to begin to draw the dimensions of the room.

Use the 3/8 side of your scale (you will measure right to left!)


Step 3:

  Now begin drawing out the dimensions of your floor plan, all at 30-degrees from the bottom edge of the page. The width of the room will go 30-degrees in one direction, the depth will go 30-degrees in another.


Step 4: Rough in the entire floor plan of the room to make sure it all fits. Try to make the floor plan fit on the page with alot of room up top, so that you can add the Height dimension.


Step 5: Add the height dimension of the walls, which will be drawn at 90-degrees from the bottom edge of the page. Draw in just the back walls. The front walls are "cut away" so you can see in side.


Step 6: Draw any objects, windows or other details that you wish. I've even drawn myself into the room. Remember all height dimensions are at 90-degrees, and all width and depth dimensions are at 30-degrees.


Class #4 Lecture: Introduction to Scales and Isometric Drawings


Get Link:
https://drive.google.com/open?id=16ah4tCfn-dbHVzrjxv6PKE9ZFFvKX7P2m4eAUG6IKgg

Monday, March 21, 2016

Class#3 HW: Oblique Drawing of your OBJECT

Homework #3
Oblique Drawing of Your Object

Homework #3 : Oblique Drawing of Your Object  DUE by Class #4

Use an 9x12”  sheet of grid paper.
Draw the front face of the object first (Take care in choosing the side that gives the most information about the form).

Then extend the right side of your object at a 45 degree angle. (all lines parallel to the ground plane on this side will also be 45 degrees).

This is a "cavalier" oblique projection, so you will attempt to make the right side width true to the actual object. (see attached image)

If you are having trouble, try simplifying your object as one or more large cubes.

If it will fit, draw the object at 100% its actual size (each grid square is 1/4" inch)

If you object is small, draw it around 2-times the actual size, so that it will take up most of your page.

Clas#3, Introducing Projections


Get Link:
https://drive.google.com/open?id=1dNPowaw2JmioyKaqd24o8S2qud-vc_EcVsNdc8nyCpw